SEASONING
NEW SMOKER
After assembly, I "seasoned" the new smoker wiping the inside
of the Smoke Chamber by rubbing it with a rag and Peanut Oil (withstands
higher heat than most cooking oils). I used a spray cooking oil for the
hard to reach places. I cooked with a full load of charcoal and extra
wood (no food) to raise the heat around 350°. After a couple of hours
I lowered the heat to around 250° and cooked for the remainder of
the time... about 6 to 8 hours. The next morning I wiped off the excess
oil and did another test run without food to determine where the leaks
were located.
 FIXING
FACTORY THINGS
FIXING
FACTORY THINGS
I found that the bracket support (noted by the circle) for the shelf was
obstructing the complete closure of the Smoke Chamber lid. This created
a gap (noted with arrows) in the lid on both sides. The left side of the
lid seemed to be more obstructed than the right. I had to make two modifications.
I ground down the bracket on both sides but that didn't allow enough clearance.
I also had to elongate the mounting holes for the brackets on both sides
to position it a little lower. This
seemed to do the trick.
I then used a board and a mallet to fine tune the fit of the lid. By placing the board at the right place, I would lean on the lid enough to bend it slightly. Since the legs of this smoker isn't that sturdy, I was cautious not to put my full weight on the smoker. The mallet and board worked best for small adjustments. I did this while the smoker was cool and I would work on one sided, then the other side and then back to the original side, until it looked like a good fit.
This is very similar to adjusting a car door when replacing with a new one. I was not trying for perfection as I suspect that enough heat would cause a slight warp over time. In other words, not having a perfect fit is just the nature of the beast. A little puff of smoke here or there didn't concern me.
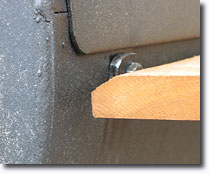 Shelf Bracket lowered for proper fit of the Smoke Chamber lid. |
I did the same for the Firebox lid. At that time, I realized that I mounted the Firebox Damper wrong and corrected its assembly.
Throughout this process I tried many different ideas and ended up with numerous holes (for screws) that I filled during the last step. However, now, I can't recall which holes were "factory" and which ones that I made myself. As I best recall, two grates came with this smoker and one could be used in the Firebox for "grilling" or both could be used in the Smoke Chamber. I believe there were four holes for screws in the Firebox side for holding the grate above the coals for grilling. If so, I removed those and plugged the holes. In my case, I eventually plugged all the holes with a welder.
The grates
used in the Smoke Chamber didn't completely fill the Smoke Chamber. They
will fit two different ways. However, I found that since the higher heat
lives on the left side of the Smoke Chamber near the Firebox, this works
out fine... I just moved them to the right. I once again filled the Firebox
and tested for leaks. All tested satisfactory.